IRIS INFO
- IRIS TYPES
- BEARDED IRIS CULTURE
- BEARDLESS IRIS CULTURE
- IRIS PESTS
The irises most often used as garden plants fall into three main groups: bearded irises, beardless irises and aril/arilbred irises, each with unique qualities. In addition, there are a number of both bearded and beardless species irises that are highly prized by New England gardeners for their unique character and charm.
Bearded Irises
")
Bearded irises are identified by the thick, bushy "beards" found on each of the falls (lower petals) of the blossoms. Originally, most of the species from which these irises were developed were native to central and southern Europe. The American Iris Society has divided the bearded irises into six classes for garden judging awards.

-
Tall Bearded (TB) -- tall, stately garden plants, TBs have stalks with a height of 70 cm (27 1/2 inches) and above, with branching and many buds. Each stalk, in itself, makes a stately arrangement in the garden or in a vase. They bloom in late May/early June in New England, depending on your location. In addition to a wide variety of colors and patterns, TBs may also have ruffling, lace and other decorations.
-
Border Bearded (BB) -- proportioned, branched and budded like the tall and stately TBs, BB are in the same height range and have roughly the same bloom size as the intermediates. BBs usually (though not always) bloom with the tall beardeds, making them perfect for later-season bloom in smaller gardens and for the front of larger beds containing TBs.
-
Intermediate Bearded (IB) -- stand from 41 cm (16 inches) to 70 cm (27 1/2 inches) high, with their bloom season usually overlapping both the SBDs and the TBs. Although the IBs show their dwarf ancestry in early bloom season and very interesting color patterns, they are large enough that their individual stalks may be nicely branched, forming an elegant bouquet. Some varieties are nicest in clumps, where they present a large amount of color (like the SDBs), while others are showiest in specimen plantings, where the stalks and individual blooms may be seen to best advantage.
-
Miniature Tall Bearded (MTB) -- this class is distinguished by daintiness and delicacy. Height is from 41 cm (16 inches) to 70 cm (27 1/2 inches), similar to that of IBs and BBs. However, the blooms are much smaller and the stems are thin and wiry, giving an MTB clump the look of a cloud of butterflies. They are often called "Table Irises" because they are so well suited for arrangements.
-
Standard Dwarf Bearded (SDB) -- some of the most useful garden plants, especially in smaller city and suburban gardens, ranging in height from 20 cm (8 inches) to 41 cm (16 inches). They begin their bloom as the MDBs are ending, still quite early in the iris season. They are best displayed in clumps where they give the effect of a "cushion" of individual blooms. SDBs come in an almost unlimited range of colors and patterns.
- Miniature Dwarf Bearded (MDB) -- the tiniest of bearded irises, with height of up to 20 cm (8 inches). They are also the earliest to bloom. They are most effective in rock gardens or planted in drifts where they make a "carpet of color."
(Note: The word "median" refers to all the bearded irises except the miniature dwarfs and the tall beardeds; that is to say the SDBs, IBs, BBs and the MTBs and species that fall into those size ranges. Strictly speaking, the word "dwarf" refers only to the MDBs and species that fall into the MDB height range.)
Beardless Irises
Beardless irises are characterized by a lack of any sort of beard on their falls. Of the different types of beardless irises listed below, siberian and Japanese irises are most commonly grown in northeastern gardens.
")
-
Siberian irises(SIB) -- primarily derived from the species Iris siberica and Iris sanguinea, these perform very well in our northeastern gardens as they prefer our cooler conditions, regular moisture and a slightly acid soil. The blooms can be blue, purple, red-violet or yellow with newer cultivars in brown and orange shades, and can have a variety of forms from upright to flat and round. They are attractive in established clumps that develop a bouquet effect and can grow to a height of 2 to 4 feet, although some dwarf varieties are also available. Their grass-like foliage after bloom is one of their attractive garden features. They tend to bloom slightly later than the TBs, though the season overlaps considerably.
")
-
Japanese irises (JI) -- primarily derived from the species Iris ensata, which is native to Japan, these require a moist, rich, slightly acid soil. Blooms can be huge, ruffled and flat in form, though simpler, smaller and more upright forms are also available. Colors range from white through various shades of orchid pink, blue and violet; some are marbled with cream or white. They bloom about a month after the TBs. Japanese iris leaves are taller and thinner than bearded iris leaves and have a distinct rib that runs lengthwise down the leaves. This rib is a good way to distinguish Japanese irises from other types of beardless irises.
-
Pacific Coast Native irises (PCN), or Californicae (CA) -- not widely grown as they are usually intolerant of the climatic conditions of all but the far western area of the country. Some varieties can succeed in New England, where they produce graceful and dainty flowers held one to two feet high. Our bitter winter weather, however, can take out established PCN plantings.
-
Louisiana irises (LA) -- native to the American Gulf Coast; they require soil that is somewhat acid and wet in the spring. The blooms are usually very wide petaled and open, showing brightly colored stylearms and sharp signal-crests. Though they are not usually happy with our northeastern climate, some LAs do very well in New England.
- Spurias (SPU) -- tall (2 to 5 feet in height) and elegant, with very attractive foliage. The shape of the bloom often suggests orchids and the colors range from white and yellow through blue, wine and brown, often with bright yellow signals. In New England, it can be difficult to get good bloom from spurias, though the plants usually grow well.
Aril Irises
")
Two very different types of irises, the oncocyclus and regelia irises of the Near East, are grouped together under the term "aril", which actually refers to a wing-like structure on the seeds of these irises that is not found on the seeds of other irises. Although they have beards, arils are not classified with the bearded irises because they are so different. Actually, their beards are rather sparse, being long and straggly on the regelias, and nothing more than a wide "fuzzy" patch on the oncocyclus. The arils show dark signal spots below the beards with much veining and speckling, and come in an unbelievable range of colors.
Unfortunately, the pure arils are difficult to grow in all but the warmest and driest regions of the United States. However, hybrids have been produced from crossing the arils with the more common bearded irises. These are called "arilbreds" (AB), and many of them, especially the ones that are 1/4 aril or less, are very easy to grow in our New England gardens. Arilbreds with TB ancestry are tall and have large blooms. There are also small arilbreds, produced from crossing arils or arilbreds with dwarfs or medians, which are variously called "arilbred-medians", "aril-medians" or "aril-meds". Most arilbreds bloom earlier than the TBs, with the SDBs and the IBs.
Species Irises

ISM gardeners grow a wide range of species irises, both bearded and beardless. Some of the more commonly grown bearded species include:
- Iris aphylla -- a hardy, very well-branched median iris, with flowers usually in some shade of violet or purple (though there are some white clones), currently being used to improve IB, BB and tetraploid MTB varieties.
- Iris astrachanica -- a hardy, small-flowered, well-branched median iris, with flowers in shades of violet, currently being used to improve diploid MTB varieties.
- Iris pallida and its subspecies -- often found in landscape plantings, the bloomstalks range from 16 to 40+ inches tall with flowers in shades of clear blue and violet.
- Iris pumila -- a very tiny, early dwarf species, with flowers in shades of white, yellow and violet. This is one of the species from which modern MDBs were developed.
- Iris variegata -- a hardy, small-flowered median iris with flowers that have standards in some shade of yellow and falls in shades of red or violet.
There are also a number of beardless iris species that do very well in our northeastern gardens, each of which has its own charm. Some favorites in New England gardens include:

- Iris cristata -- a small woodland iris that grows well in light shade. It is a small iris, 3 to 5 inches in height, with flowers in white and shades of blue and violet that have yellow or white crests on the falls. It blooms early in the spring.
- Iris gracillipes -- a small (4 to 6 inches), delicate "crested" iris (like Iris cristata) with veined blue-violet or white flowers that have white and/or yellow crests on the falls.
- Iris graminea -- also known as "the plum-tart iris", a small (6 to 10 inches), very fragrant iris (hence the nickname) with reddish-violet to purple flowers that bloom within grassy foliage.
- Iris ruthenica -- a very small (2 to 6 inches) iris with grassy foliage and fragrant flowers in shades of violet and purple.
- Iris setosa -- also known as the "arctic flag" because of its native range in the Yukon and Alaska (as well as northeastern Asia), bloomstalks range from 6 to 35 inches, with flowers in shades of blue, violet, purple, and occasionally orchid pink or white.
- Iris versicolor -- also known as "northern blue flag", a New England native that prefers moist conditions (it grows wild on riverbanks, in swampy spots and in drainage ditches). On stems from 18 to 30 inches tall, the flowers range from white through various shades of blue and red-violet.

The above only include a small sampling of the species grown in New England gardens. Others include: Iris henrii, Iris koreana, Iris lactea, Iris lacustris, Iris novum, Iris odaesanensis, Iris prismatica, Iris reticulata, Iris sintenisii, Iris verna, Iris virginica, and Iris X norisii, also known as Pardancanda, which is a hybrid of Iris dicotoma (which used to be classified and pardanthopsis dichotoma) and Iris domestica (which used to be classified as Belmancanda chinensis).
For more details on different species of irises, check the SIGNA (the Species Iris Group of North America) Web site, where they maintain an iris species database, complete with photographs.
")
Bearded irises are among the easiest of perennials to grow, and they give an abundance of beauty with minimum care. The iris has a thick fleshy root called a "rhizome" (pronounced rye-zome) about like a tough potato in texture. When you buy a new iris, you will probably receive a rhizome with clipped roots and leaves. It can remain out of the ground for a week or two without serious harm, but the sooner it is planted, the better.
")
When to Plant or Divide: For best results in New England, bearded Irises should be planted or divided in July, August or September, three to four weeks after bloom. (September is a little late in the northern parts of Maine, Vermont or New Hampshire, but early to mid September is workable in most of Massachusetts, Connecticut and Rhode Island.) It is imperative that the roots of newly planted irises (all kinds) be well established before the growing season ends.
Where To Plant: Irises need at least a half day of sun in order to bloom. The most spectacular bloom occurs in full sun. If your irises are growing well, but are not blooming, there is a very good chance that they are not getting enough exposure to the sun. They may also be overcrowded an in need of division. Be sure to provide your irises with good drainage. If a bearded iris rhizome sits in water for more than a couple days, it may rot.
Soil Preparation: Irises will thrive in most well-drained soils. The soil should be worked to a depth of ten inches. If your soil is heavy, coarse sand or humus can be added to help drainage. Gypsum is a good soil conditioner that can improve most clay soils. The ideal pH is 6.8 (slightly acid), but bearded irises are tolerant in this regard. To adjust the pH of your soil, lime can be added to acidic soils or sulfur to alkaline soils. It is best to have your soil analyzed before taking corrective measures. Soils in most of New England tend to be on the acid side.
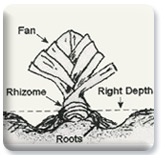 Depth to Plant: Bearded irises should be planted so the tops of the rhizomes are just at the surface of the soil, while the roots are placed deeper in the soil. Mound the soil in the bottom of the hole and place the rhizome on the mound with the roots flowing unbent over the sides spread out, facing down, where they will enjoy the damp (not soggy) soil. Firm the soil around each rhizome and then water to help settle the soil. A common mistake is to plant bearded irises too deeply; if they are planted too deep, the rhizomes can rot and your irises may disappear.
Fertilizer: Fertilizer should be applied as a side dressing in early spring and/or as a side dressing after bloom. Too much fertilizer can burn rhizomes, so fertilizer should be applied around the plant, not on it. Do NOT use lawn fertilizers with high nitrogen content. Too much nitrogen promotes soft, lush growth that is susceptible to rot, so a 5-10-5/ 5-10-10 or similar formula is usually best, though some growers use a 10/10/10 formula to good effect. Many of our growers also use alfalfa (available locally in pellet or meal form) as a supplementary fertilizer because of the many micronutrients it adds to the soil.
Distance Apart: Distance apart varies according to the effect desired. Close planting (8 to 10 inches) can provide an immediate effect, but the plants will get crowded and need dividing more often. Planted at least 2 feet apart, they will only need dividing every 3 to 4 years. If you have more than one rhizome of a cultivar, you can arrange them in a clump with the leaf fans facing out from the center. Planting three rhizomes in a triangle of equal sides gives an attractive clump effect.
Dividing: When dividing, dig the plant up (a garden fork is the best tool). Each division should have one or more sections approximately two to six inches with leaves and healthy white roots. Remove and discard the old center rhizomes plus anything that may have rotted or been attacked by pests. You may cut the old centers with a knife while they are in the ground if you do not want to lift the whole plant.
Care of Plants: Care of plants is relatively simple. Keep weeds and grass tufts out of the rhizomes/clumps. Cultivate shallowly around the plants, since the feeder roots are near the surface. Newly set plants should be kept moist until the roots are growing well. Established plants may need watering during prolonged dry spells; at such times, deep, infrequent watering is best. Air circulation and sanitation are the best problem preventatives. Remove old (dead) iris leaves and other debris from around the base of the plant. Old bloom stalks should be broken off at ground level, but healthy, green foliage should not be cut off after bloom. The foliage should be left on the rhizomes after bloom, to foster development of the new sprouts for the next season. In the late fall, iris foliage can be cut back to 4 or 5 inches above the rhizomes, and any dead foliage removed. This helps keep the clumps clean and free of pests such as borer and thrips, which can overwinter in dead iris foliage.
Mulching: Mulching of bearded irises is to be avoided during the growing season. If you want to mulch the bed for appearance, you should NOT cover the rhizomes. The sun must reach them to facilitate development of next year’s increase. Mulching over the winter, however, especially in those areas of New England that do not get reliable snow cover, can help keep iris rhizomes from heaving out of the ground as a result of successive freezes and thaws. Acceptable winter mulches include pine needles, salt marsh hay (Spartina patens), weed-free oat straw, or even evergreen boughs, which should be applied in the late fall. If you wait to apply winter mulch until after the ground is frozen, this can help to keep mice and voles from making homes in the soil under the mulch. In the early spring, usually late March, the mulch must be removed. If any roots have been heaved out of the ground, simply cover them with additional soil. In most areas of New England, established bearded iris clumps do not require winter mulch. However, we strongly recommend winter mulching newly planted irises to keep from losing them to frost heaving. The reason for using pine needles or salt marsh hay is that they do not hold water or get soggy. Prolonged wetness on bearded iris rhizomes over the winter can produce rot.
")
The most common beardless irises grown in New England are siberian irises, which are relatively low maintenance irises, and Japanese irises, which require more fertilizer and water to grow well, and which bloom from late June to July in New England.
")
Planting: The rhizomes of Japanese and siberian irises should be planted 2 to 3 inches deep. Plant them in a depression that will help catch water, and fill the depression with organic mulch. Japanese iris plants under good culture require division every 3 to 4 years. SIberian irises can be left in place for many years as long as they have sufficient room to grow and haven't gotten hollowed out in the middle of the clump. After planting or division it is essential to not let the irises dry out while they are getting established. Best bloom is usually on 2 to 3 year old clumps. Like other irises, Japanese and siberian irises prefer a sunny location with at least 6 hours of sunlight for the best bloom.
Water: Japanese irises require ample moisture, especially up to bloom time, and you will be rewarded with much healthier plants and bloom if the plants are kept watered all summer long. Lack of moisture will stunt the plants and produce small blooms. Siberian irises, on the other hand, will grow in any reasonably decent garden soil and do not require the same amount of water Japanese irises require. Both Japanese and siberian irises must be kept moist until they are well established. If the roots of Japanese or siberian irises are dry on arrival, soak them in water for several hours or overnight before planting.
Soil: Japanese irises prefer a rich soil with ample organic matter, which helps in water retention as well as adding nutrients. The soil pH should be slightly acidic, ideally between 5.0 and 6.5. Never add lime to the soil Japanese irises are grown in, as this will raise the pH and eventually kill the plants. Siberian irises are much more forgiving of different garden conditions, will grow in any reasonably decent garden soil and are tolerant of a wide range of pH levels.
Fertilizer: A liberal application of a balanced fertilizer (10/10/10) in the spring and just before bloom is beneficial. Weak plants will be invigorated with a biweekly foliar or drench application of a water-soluble acid fertilizer such as Miracid. The preparation of your iris bed with composted manure and peat will be a good start for your beardless irises, but once planted do not fertilize transplants until they have become established.
Mulch: We recommend mulching year round for Japanese and siberian irises, 2 - 3 inches. The mulch helps to conserve moisture, discourage weeds, and prevents heaving of fall transplants. Remove/cut down old foliage after the first frosts with a serrated knife. Destroy the old foliage, which may contain borer eggs or thrips.
Dividing: Japanese irises usually need to be divided every 3 to 4 years. Siberians can be left in place more or less indefinitely without significant loss of vigor or bloom, as long as the clump is healthy. A Japanese or siberian iris clump that has formed a solid ring with a bare center needs to be divided regardless of how long it has been in the same place. After the plants have been divided, trim the leaves to a height of four to six inches. Replant the divisions in a depression and keep the new divisions wet. Japanese and siberian irises can be divided at most any time during the growing season. However, in New England, dividing beardless irises in the spring is generally more effective than dividing them later; it is easier to keep the divisions moist in the spring and the plants are well rooted by the time winter sets in. If they are divided later in the summer, care must be taken to make sure the divisions do not dry out.
For Japanese irises, after division, the plants should be moved to a new location where Japanese irises have not grown before. It appears that Japanese irises excrete something into the soil that causes the irises to lose their vigor over time and decline. It is recommended that something other than irises be planted in the soil after the Japanese irises are removed; while other types of irises will grow where Japanese irises have been planted, they may not grow vigorously. The one exception to this is soil that has a lot of water leaching through it, such as soil under a downspout or by the side of a stream. Whatever is causing the irises to lose vigor appears to be removed by water leaching. Research is ongoing in Japan to determine what is causing this. Japanese irises in Japan are commonly grown in pots and it is easier to replace the soil the irises grow in.

Iris borer: Macronocture onusta, the iris borer, can pose serious and frustrating problems for the iris grower in the eastern United States. They will attack all kinds of irises. The "iris borer" is actually the larval form of a moth, and is a wonder of iris destruction. The larvae have been found to be cannibals who eat their rivals. They also can spin a tiny web and use it to hang-glide off to irises some distance from where they hatched. Oddly enough, the iris borer was first discovered in the 1890s in the northern suburbs of Chicago...on some daylilies!
The most effective control relies on an understanding of the borer's life cycle. Borers begin life as eggs, laid on garden debris in the late summer and fall. Each spring, the borers larvae begin to hatch after the first two days of temperatures greater than 70 degrees. New England gardeners also have observed that hatch begins about the time the tulips bloom and it continues into June. The ¼ inch long larvae crawl up the iris leaves. Near the top they chew into the leaves. Then they eat their way down inside the leaves to the rhizomes, where they gorge themselves until they reach a length of about 1 to 1 ½ inches.  Borers often will hollow out whole rhizomes causing fans to collapse and the remaining tissue to rot. Some time in the summer the borer larvae change into pupae with a chestnut brown chrysalis or cocoon. These pupae reside in the soil for about a month and then a moth emerges and lays eggs. Borers in the pupae, moth and egg stages do not feed. Only as a larvae do they eat and do damage. At this stage they are most vulnerable to our efforts to control them.
Keeping a clean garden is the first step in minimizing borer problems. In the summer and fall, the borer moths lay their eggs on the iris foliage or on the foliage of nearby plants. In the fall, cut back the iris leaves and remove them from your property or destroy them if possible. This will reduce the number of borers that hatch the following spring. In the spring, watch for the signs of borer infestation. A sharp eye for borer entry allows some gardeners to catch the borer in the leaf before it travels to the rhizome (simply pinch them in the leaves). If the borer has chewed its way further down the leaf, it maybe easier to remove a portion of the leaf, then search for and destroy the borer.
Iris borers can also be controlled with certain pesticides, including imidacloprid and acephate-based systemic insecticides, though great care should be taken with these pesticides, which have varying levels of toxicity to humans as well as to beneficial insects and other animals. Alternative, less toxic pesticides include repellents containing methyl nonyl keytone (GardenShield(tm)), parasitic nematodes (Steinernema carpocapsae and Heterorhabditis bacteriophora have been shown to be effective on iris borers), and bio-insecticides based on spinosads (metabolites from the fermentation of certain soil-dwelling bacteria). With any pesticide, whether chemical or biological, the key is to apply it when borers are just hatching in the spring, after the first two days above 70 degrees. This is when borers are most vulnerable. In addition, cutting back iris foliage in the fall and removing or burning any dead iris foliage remaining on the plants in the spring has proven to be effective in helping to control iris borers, which can overwinter in garden debris.
Root Rot: Outbreaks of bacterial soft rot usually occur when excessive moisture is present. It is often associated with some sort of injury to the rhizome, as caused by insects or cultivation. Over watering and over fertilizing are potential causes of this foul smelling problem. Often it appears first at the base of the leaves where they join the rhizome, and is manifested by a yellowing of the fans. Keep a sharp eye out for such signs during wet weather. The sooner the problem is detected the more successful your treatment will be. The soft mushy tissue must be removed. If soft rot occurs in established clumps, it is easiest to cut out the affected rhizomes, thus minimizing the injury to the healthy rhizomes that remain.
If you are not dealing with an established clump, you may remove enough soil from around the rhizome to expose just the affected area, leave the roots that anchor the plant in place. Then, using an old spoon or knife, carefully scoop out all the mushy tissue. If the problem seems extensive, you may want to dig the plant up to remove all the rotten tissue. The wound made to the rhizome while removing rotten material should be disinfected. Some gardeners dust with sulfur, but we suggest drenching with a bleach solution (1 part bleach to nine parts water). After the wound has been disinfected, allow the sun to dry and heal the damaged area of the rhizome for several days before covering with soil.

Leaf Spot: This common fungal problem appears with wet conditions: rain, high humidity, fog or even overhead irrigation. Small yellow and brown spots appear near the tops of the leaves and eventually spread downward, consuming the leaves. In most cases this disease is unsightly and destroys some leaves. In extreme cases, if allowed to progress unchecked, the rhizomes may rot. The spores that cause leaf spot can live over the winter on garden debris. It is important to keep a clean garden. Be sure to remove old dead iris leaves. Keep an eye out for the onset of leaf spot during wet weather. Cut off and destroy any leaf or part of a leaf that is affected. Not only will your garden look better, but you also will be removing the fungal spores. Some growers undertake a biweekly spraying program with a fungicide when conditions are ripe for leaf spot, spraying less often if the weather is dry and more often in wet weather.
Iris Bud Fly: The larva of Neorthochaeta dissimilus, or the iris bud fly, is a hybridizer’s nightmare; it is a small white maggot that bores into the side of an iris bud to eat the pollen inside. The standards and style arms of the iris blossom are usually destroyed in the process. When the blossom opens, it is disfigured. They seem to prefer siberian irises, but will attack other irises. When you see a small hole in the side of a bud or a disfigured blossom, remove it and check the stem. If there is no sign of passage, then you have it. Carefully break the bud or blossom apart, look for the maggot and destroy it. You can also put them into a zip lock bag for destruction. If the stem shows sign of passage, then the maggot has gone down the stem to change into the fly. Another way to control an outbreak of the bud fly is to spray with a systemic insecticide when the buds have formed; this can be done when spraying for iris borers, but be careful not to spray something that will harm beneficial insects when they come to the flowers.
Other Pests: Sucking insects such as aphids, thrips and white flies can damage irises and spread diseases. Control these pests by spraying a chemical or biological pesticide designed to target these soft-bodied insects, but be careful to follow the manufacturer's instructions and heed all safety warnings. Insecticidal soaps are effective control of most of these pests, and do not harm beneficial insects. Bacillus thurgingiensis (Bt) is an environmentally safe and effective control for chewing insects such as caterpillars.
Slugs and Snails: Other enemies of irises are slugs and snails. They love to chew on iris leaves causing unsighly damage. Diseases can get into the rhizomes through the damaged areas left by these land mollusks. Keeping a clean garden, which removes protective cover for snails and slugs, is a good beginning. In early spring, when evidence of slug or snail damage is present, baiting for these pests is a good method of control. You can choose the type of bait that you think is best for your environment.